连接到 OpenERP
由于这是您第一次连接到 OpenERP, 你将有机会来配置系统. 你可以选择其中一种 Skip Configuration Wizards 或 Start Configuration. 我们将继续通过点击系统配置 Start Configuration.
配置包括一组向导,它可以帮助你通过选项来安装模块。 安装过程在这块是一个非常简单的.
- Configure Your Interface : 选择
Simplified并点击 Next.
- 在 Company Configuration 步骤, 输入你自己的 Company Name 和 Currency. 这里可以加公司地址, 联系方式等其他详细信息和公司 Logo, 如果你有的话, Logo将在报表上展示. 然后, 点击 Next.
- 在 Install Applications 部分将允许你添加应用到你的 系统中. 眼下, 点击 Skip 不安装任何应用. 你现在连接到 OpenERP 可以开始以管理员用户来使用系统.
第一屏显示的是下图所示的主菜单 The Main Menu of the openerp_ch02 database:
- 在登陆的帐套名提示下面是你当前的登陆用户.
- ONLINE SUPPORT 按钮, 给你一个OpenERP提供的支持服务的总览,他对会员开放,
- 右上角的 Preferences 工具栏,用来显示 HOME 页的链接, EDIT PREFERENCES 页, ABOUT, HELP 和 LOGOUT 按钮,
- 下面就是所安装程序的菜单条目的链接图标(用户可以自定义),
- 在主页的右侧,主菜单的旁边是一组小工具(widgets)的快捷菜单。
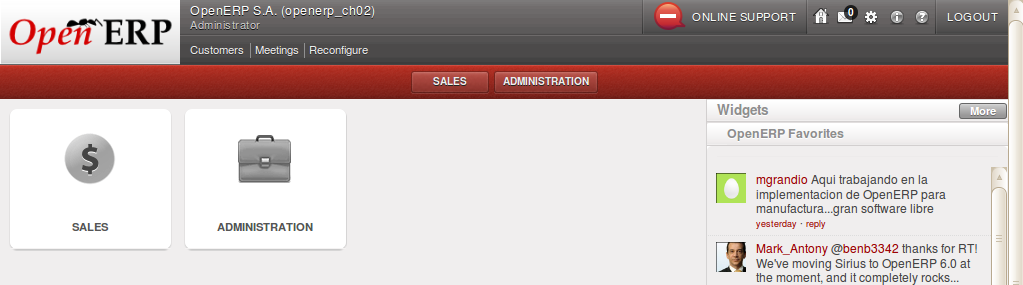
The Main Menu of the openerp_ch02 database
当前有两个可用菜单:
工具栏首选项
当你连接到OpenERP,最上面的工具栏指出你是使用哪一个用户进行的连接。所以当前它显示 Administrator (如果你使用另一个用户登录,它会相应的显示另一个用户名)。
你能看到顶端工具栏右侧包含了一组有用的链接。首先,你会看到一个:guilabel:HOME 页的链接。
This takes you to either the
Home page containing links to the available menus or to another window or dashboard, depending on the
user configuration. In the case of the openerp_ch02 database, so far the Home page
is the Main Menu. But in general each user of the
system is presented with a dashboard that is designed to show performance indicators and urgent
documents that are most useful to someone of the user’s position in the company. You will see how to
assign dashboards to different users in a later chapter, 配置与系统管理.
Tip
Multi-nationals and Time Zones
If you have users in different countries, they can configure their own timezone. Timestamp displays are then adjusted by reference to the user’s own localization setting.
So if you have a team in India and a team in England, the times will automatically be converted. If an Indian employee sets her working hours from 9 to 6, that will be converted and saved in the server’s timezone. When the English users want to set up a meeting with an Indian user, the Indian user’s available time will be converted to English time.
The next element in the toolbar is a link to EDIT PREFERENCES. By clicking that link, you get a dialog box where the current user can set his interface in the Current Activity tab; and in the Preferences tab, set his password, a timezone, a working language, e-mail and a signature:
- The Interface field in the Current Activity tab allows the user to switch
between the
SimplifiedandExtendedinterfaces. - The Language field enables the user’s working language to be changed. But first, the system must be loaded with other languages for the user to be able to choose an alternative, which is described in the next subsection of this chapter. This is a mandatory field.
- The Timezone setting indicates the user’s location to OpenERP. This can be different from that of the server. All of the dates in the system are converted to the user’s timezone automatically.
- The Menu Tips checkbox gives the user the choice to have tips displayed on each menu action.
- The Change Password button gives users the opportunity to change their own password. It opens a new dialog box where users may change the password and must logout and login again after the change. You should take steps (perhaps written policies) to prevent users making these too trivial.
- The Email field is for storing the current user’s default e-mail address.
- The Signature field gives the user a place for the signature attached to messages sent from within OpenERP.
The ABOUT link gives information about the development of the OpenERP software and various links to other information.
The HELP link directs the user to the online documentation of OpenERP, where extensive help is available on a host of topics.
The LOGOUT link enables you to logout and return to the original login page. You can then login to another database, or to the same database as another user. This page also gives you access to the super-administrator functions for managing databases on this server.
安装新的语言
Each user of the system can work in his or her own language. More than twenty languages are currently available besides English. Users select their working language using the Preferences link. You can also assign a language to a partner (customer or supplier), in which case all the documents sent to that partner will be automatically translated into that language.
Attention
More about Languages
The base version of OpenERP is translated into the following languages: English, German, Chinese, Spanish, Italian, Hungarian, Dutch, Portuguese, Romanian, Swedish and Czech.
But other languages are also available: Arabic, Afghan, Austrian, Bulgarian, Indonesian, Finnish, Thai, Turkish and Vietnamese..
As administrator, you can install a new main working language into the system.
- Select in the Menu Toolbar and click in the main menu window,
- Select the language to install,
Frenchfor example, and click Load,- The system will intimate you when the selected language has been successfully installed. Click Close to return to the menu.
To see the effects of this installation, change the preferences of your user to change the working language (you may first need to ensure that you have explicitly selected English as your language, rather than keep the default, before you are given the French option). You may have to reload the page to see the effects. The main menu is immediately translated in the selected language. If you are using the GTK client, you will first have to close the menu then open a new main menu to start seeing things in the new language.
Note
Navigating the Menu
From this point in the book navigation from the main menu is written as a series of menu entries connected by the character. Instead of seeing “Select Administration in the Menu toolbar then click Translations > Load an Official Translation” you will just get “use menu ”.
站内信
Requests have been removed in OpenERP 6.1 - a new internal communication system will be added in 7.0.
配置用户
The database you created contains minimal functionality but can be extended to include all of the potential functionality available to OpenERP. About the only functions actually available in this minimal database are Customers and Currencies – and these only because the definition of your main company required this. And because you chose to include demonstration data, both Customers and Currencies were installed with some samples.
Because you logged in as Administrator, you have all the access you need to configure users. Click
to display the list of users defined in the
system. A second user, Demo User , is also present in the system as part of the
demonstration data. Click the Demo User name to open a non-editable form on that user.
Click the Groups tab to see that the demo user is a member of only the Employee group,
and is subject to no specialized rules.
The user Administrator is different, as you can see if you
follow the same sequence to review its definition. It is a member of the Administration / Configuration and the Administration / Access Rights groups,
which gives it more advanced rights to configure new users.
Tip
Groups and Users
Users and groups provide the structure for specifying access rights to different documents. Their setup answers the question “Who has access to what?”
Click to open the list of
groups defined in the system. If you open the form view of the Administration / Configuration group by clicking its name in the list, the first tab Users gives you the list of
all the users who belong to this group.
You can also see in the Menus tab, the list of menus reserved for this group. By convention,
the Administration / Configuration in OpenERP has rights of access to
the menu in each section. So Sales / Configuration is
found in the list of access rights but Sales is not found there because it is accessible
to all users. Click the Access Rights tab and it gives you details of the access rights
for that group. These are detailed later in 配置与系统管理.
You can create some new users to integrate them into the system. Assign them to predefined groups to grant them certain access rights. Then try their access rights when you login as these users. Management defines these access rights as described in 配置与系统管理.
Note
Changes to Default Access Rights
New versions of OpenERP differ from earlier versions of OpenERP and Tiny ERP in this area: many groups have been predefined and access to many of the menus and objects are keyed to these groups by default. This is quite a contrast to the rather liberal approach in 4.2.2 and before, where access rights could be defined but were not activated by default.
管理业务伙伴
In OpenERP, a partner represents an entity that you do business with. That can be a prospect, a customer, a supplier, or even an employee of your company.
业务伙伴列表
Click in the main menu to open the list of partners who are customers. Then click the name of the first partner to get hold of the details – a form appears with
information about the company, such as its corporate name, its primary language, its reference and whether it is a
Customer and/or a Supplier . You will also find several other tabs on it:
- the General tab contains information about different contacts at that partner, postal information, communication information and the categories it belongs to.
- the Sales & Purchases tab contains information that is slightly less immediate.
- the tab (visible if you install other modules like
crm) contains the history of all the events that the partner has been involved in. These events are created automatically by different system documents: invoices, orders, support requests and so on, from a list that can be configured in the system. These give you a rapid view of the partner’s history on a single screen. - the tab is an area for free text notes.
To the right of the form is a list of Reports, Actions, Links and Attachments related to a partner. Click some of them to get a feel for their use.

Partner form
Tip
Partner Categories
Partner Categories enable you to segment different partners according to their relation with you (client, prospect, supplier, and so on). A partner can belong to several categories – for example it may be both a customer and supplier at the same time.
But there are also Customer and Supplier checkboxes on the partner form, which are different. These checkboxes are designed to enable OpenERP to quickly select what should appear on some of the system drop-down selection boxes. They, too, need to be set correctly.
业务伙伴分类
You can list your partners by category using the menu . Click a category to obtain a list of partners in that category.
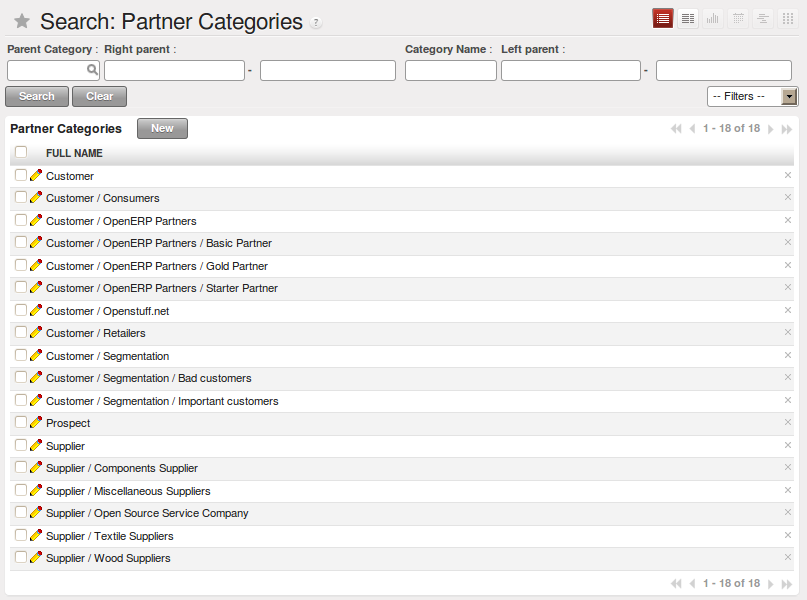
Categories of partner
The administrator can define new categories. So you will create a new category and link it to a partner:
- Use to reach the list of categories in a list view.
- Click New to open an empty form for creating a new category
- Enter
My Prospectsin the field Category Name. Then click on the Search icon to the right of the Parent Category field and selectProspectin the list that appears.- Then save your new category using the Save button.
You may add exiting partners to this new category using the Add button in the Partners section.
Tip
Required Fields
Fields colored blue are required. If you try to save the form while any of these fields are empty, the field turns red to indicate that there is a problem. It is impossible to save the form until you have completed every required field.
You can review your new category structure using the list view.
You should see the new structure of Prospects / My Prospects there.
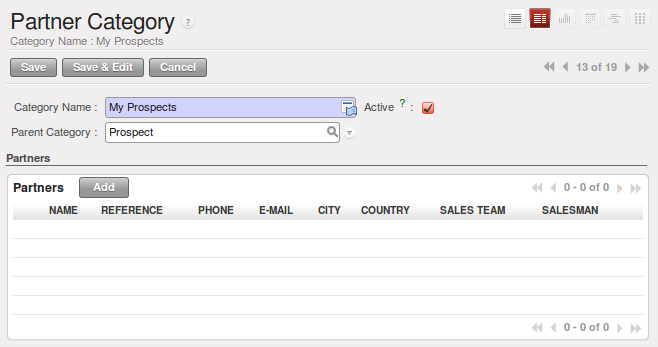
Creating a new partner category
To create a new partner and link it to this new category, open a new partner form to modify it.
- Type
New Partnerinto the Name field.- In the General tab, click the Add button under the Categories section and select your new category from the list that appears:
Prospect / My Prospects.- Then save your partner by clicking Save. The partner now belongs in the category
Prospect / My Prospects.- Monitor your modification in the menu . Select the category Prospect / My Prospects. The list of partners opens and you will find your new partner there in that list.
Tip
Searching for Documents
If you need to search through a long list of partners, it is best to use the available search criteria rather than scroll through the whole partner list. It is a habit that will save you a lot of time in the long run as you search for all kinds of documents.
Note
Example Categories of Partners
A partner can be assigned to several categories. These enable you to create alternative classifications as necessary, usually in a hierarchical form.
Here are some structures that are often used:
- geographical locations,
- interest in certain product lines,
- subscriptions to newsletters,
- type of industry.