添加系统新业务
All of OpenERP’s functionality is contained in its many and various modules. Many of these, the core modules, are automatically loaded during the initial installation of the system and can be updated online later. Although they are mostly not installed in your database at the outset, they are available on your computer for immediate installation. Additional modules can also be loaded online from the official OpenERP site http://openerp.com. These modules are inactive when they are loaded into the system, and can then be installed in a separate step.
You will start by checking if there are any updates available online that apply to your initial installation. Then you will install a CRM module to complete your existing database.
更新模块列表
Click to start the updating tool. The Module Update window opens notifying the user that OpenERP will look at the server side for adding new modules and updating existing ones.
Click Update to start the update on the server side. When it is complete, you will see a Module update result section indicating how many new modules were added and how many existing modules were updated. Click Open Modules to return to the updated list.
Note
Modules
All the modules available on your computer can be found in the addons directory of your OpenERP server. Each module there is represented by a directory carrying the name of the module or by a file with the module name and .zip appended to it. The file is in ZIP archive format and replicates the directory structure of unzipped modules.
Tip
Searching through the whole list
The list of modules shows only the first available modules. In the web client you can search or follow the First / Previous / Next / Last links to get to any point in the whole list, and you can change the number of entries listed by clicking the row number indicators between Previous and Next and selecting a different number from the default of 20.
If you use the GTK client you can search, as you would with the web client, or use the selection field (currently showing 80) to the top right of the window to change the number of entries returned by the search from its default limit of 80, or its default offset of 0 (starting at the first entry) in the whole list.
配置及重运行配置向导
One of the new features of OpenERP is the Configuration wizard. Once run, the Reconfigure shortcut will appear. This wizard provides an easy way to install modules, thanks to its user-friendly and easy-to-use interface. The user may invoke this wizard at his own convenience using the shortcut Reconfigure, found just below the database and user name in the web interface or in the Shortcut menu in the GTK client. The same Configuration dialog box appears that you may have encountered at the time of installing a new database. Why did we call it the Reconfigure wizard? Indeed, because it allows the user to review installed applications and install related additional features or simply to install new applications on the fly.
When you go through the various steps in the wizard, you will come across some options that are checked and greyed. These are applications already installed. In the openerp_ch02 database configuration, you may see that the Customer Relationship Management option is already checked because this Business Application has been installed in this database.
Install extra applications simply by checking the corresponding options and clicking Install or click Skip to stop the configuration. You will eventually also come across the CRM Application Configuration step which you may use to add features to your CRM application. For now, select the Claims option and click Configure. This will in turn install the crm_claim module.
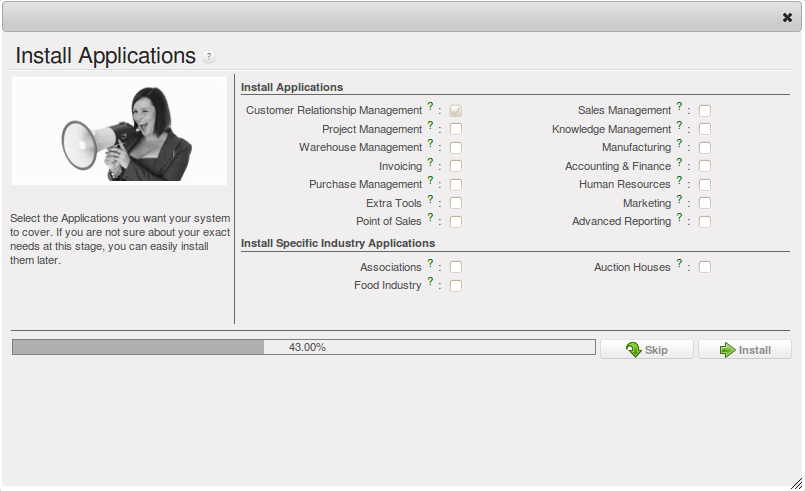
Reconfigure wizard showing Customer Relationship Management application as installed
You may continue adding features this way, skip configuration steps or simply exit from this wizard. When you feel the need to load your system with additional features, you may invoke the Reconfigure wizard again at any point.
Note
You can also change the Configuration Wizard through the .
安装新模块及应用
You will now install a module named google_map, which will enable you to add a feature to the partner form to open the location directly in Google Maps. This is part of the core installation, so you do not need to load anything to make this work.
Open the list of modules from . Search for the module by entering the name google_map in the Name field on the search screen then clicking it in the list that appears to open it. The form that describes the module gives you useful information such as its version number, its status and a review of its
functionality. Click Schedule for Installation and the status of the module changes to To be installed.
Tip
From now on you can schedule and install modules from list view too. Notice the buttons on the right side and the action button to install.
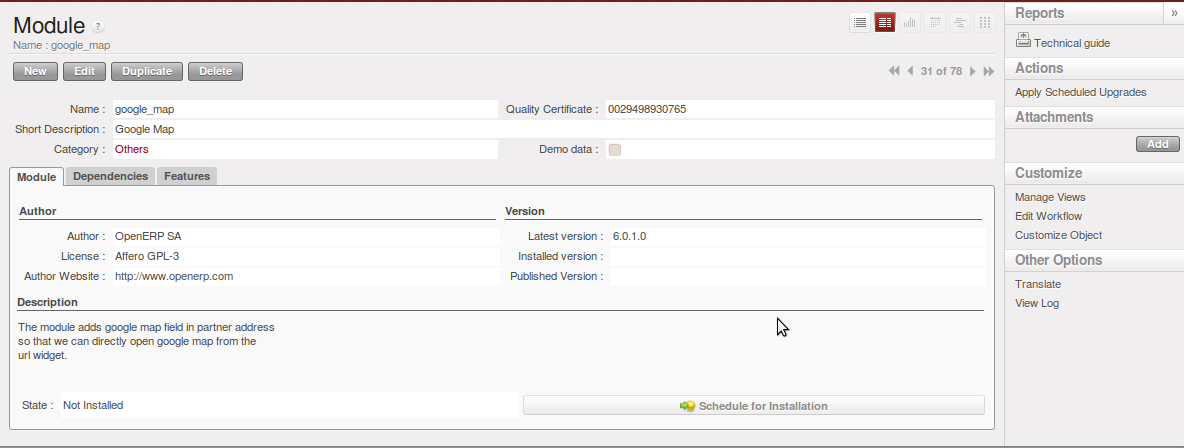
Installation of the Google Maps module
Tip
Technical Guide
If you select a module in any of the module lists by clicking on a module line and then on Technical Guide at the top right of the window, OpenERP produces a technical report on that module. It is helpful only if the module is installed.
This report comprises a list of all the objects and all the fields along with their descriptions. The report adapts to your system and reflects any modifications you have made and all the other modules you have installed.
Then, either use the menu , or from the Actions section click Apply Scheduled Upgrades, then Start update on the Module Upgrade form that appears. Close the window when the operation has completed. Return to the Sales menu; you will see the new menu has become available.
Tip
Refreshing the menu in the GTK Client
After an update in the GTK client you will have to open a new menu to refresh the content –
otherwise you will not see the new menu item. To do that, use the window menu or use the shortcut Ctrl+R.
安装模块及其依赖模块
Now install the Warehouse Management module using the same process as before. Start from .
- Get the list of modules, and search for the
stockmodule in that list.- Schedule the module for installation by clicking Schedule for Installation.
- Do the same for
account.- Click Apply Scheduled Upgrades on the action toolbar to the right.
- Click Start update to install both modules.
- After a few seconds, when the installation is complete, you may close this dialog box.
- You will see details of all the features installed by the modules on a new Features tab on the module form.
When you return to the menu, you will find the new menu items under it like , , which are a part of the Warehouse management system. You will also see all the accounting functions that are now available in the menu.
There is no particular relationship between the modules installed and the menus added. Most of the core modules add complete menus but some also add sub-menus to menus already in the system. Other modules add menus and sub-menus as they need. Modules can also add additional fields to existing forms, or simply additional demonstration data or some settings specific to a given requirement.
Note
Dependencies Between Modules
The module form shows two tabs before it is installed. The first tab gives basic information about the module, and the second gives a list of modules that this module depends on. So when you install a module, OpenERP automatically selects all the necessary dependencies to install this module.
That is also how you develop the profile modules: they simply define a list of modules that you want in your profile as a set of dependencies.
Although you can install a module and all its dependencies at once, you cannot remove them in one fell swoop – you would have to uninstall module by module. Uninstalling is more complex than installing because you have to handle existing system data.
Note
Uninstalling Modules
Although it works quite well, uninstalling modules is not perfect in OpenERP. It is not guaranteed to return the system exactly to the state it was in before installation.
So it is recommended that you make a backup of the database before installing your new modules so that you can test the new modules and decide whether they are suitable or not. If they are not, then you can return to your backup. If they are, then you will probably still reinstall the modules on your backup so that you do not have to delete all your test data.
If you wanted to uninstall, you would use the menu and then uninstall them in the inverse order of their
dependencies: stock, account.
安装附加功能
To discover the full range of OpenERP’s possibilities, you can install many additional modules.
Installing them with their demonstration data provides a convenient way of exploring the whole core
system. When you build on the openerp_ch02 database, you will automatically include
demonstration data because you checked the Load Demonstration Data checkbox when you originally
created the database.
Click to give you an overview of all of the modules available for installation.
To test several modules, you will not have to install them all one by one. You can use the dependencies between modules to load several at once.