OpenERP 的开票流程也很简单,参见下面的工作流程图:
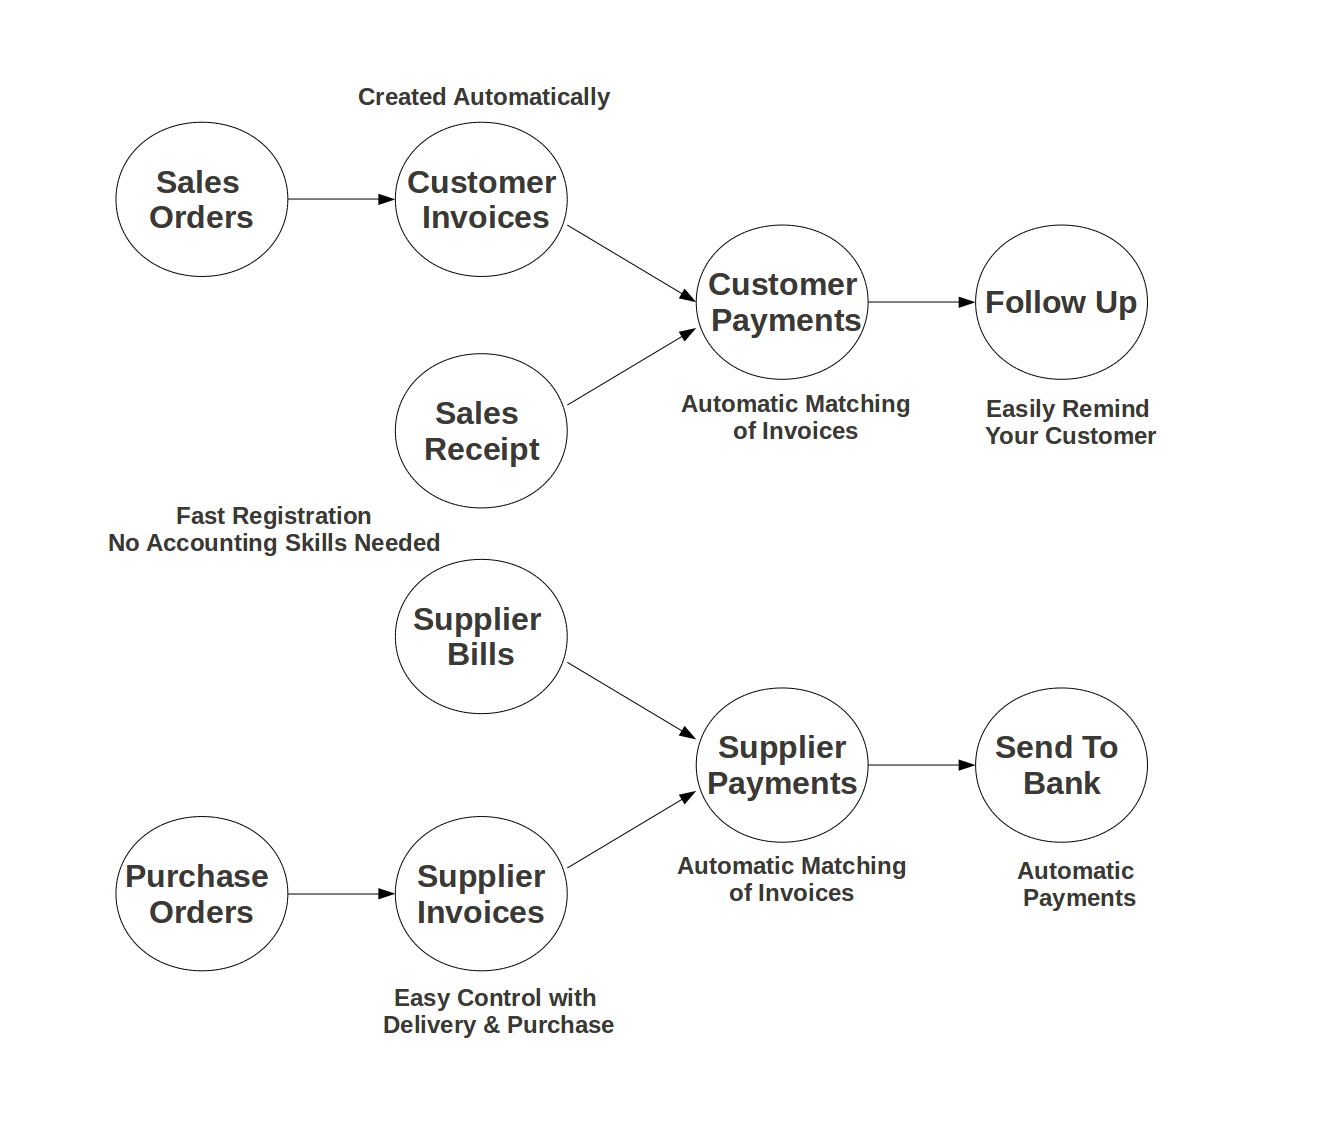
开票流程
发票可根据其他各种文件生成,如销售订单,采购订单,或在确认发货时间时生成。 当您的OpenERP是一真正的集成系统时将提供这些方法.
当然,企业通常与记录这些信息的会计师一起工作。在这种情况下,您想知道哪些发票已经开出,并已支付。
Openerp中简明并易用的 开票 系统使你能跟踪您的账务,即使您不是一个专职财务人员。
它提供了一个简单的方法来跟踪你的供应商和客户。您可以使用这个简化的会计系统,即使您和专职财务人员一起工作的情况下,您仍然希望了解付款情况。
开票 系统包括了收款和付款 (一种跟踪销售和采购的简单方法). 它也提供一个简单的方法来登记付款,不需要您填写完整的会计信息
简单的客户收据
当您卖产品给客户时,您可以给他一个真正的发票或销售收据,这也被称为客户收据。销售收据仅仅是一种销售小票,而不是一个真正的发票。
当销售收据确认后,OpenERP的自动创建销售记录,并记录客户有关这张收据的付款情况。 简单的发票系统并不需要做大量的会计配置,因此您能很快上线并快速使用!
您可以通过以下菜单创建和修改销售收据 .
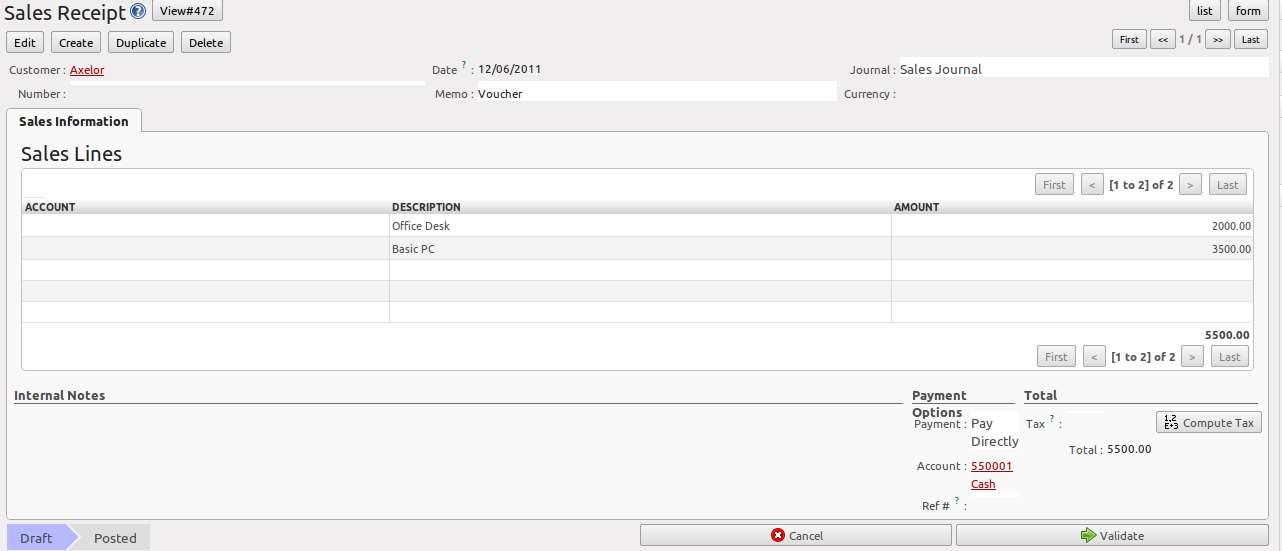
创建客户收据
当您创建一张新的“销售收据”时,您必须录入“客户”——您想创建该凭证的对象。您可以在“销售信息”页签里面定义”销售明细行“,在这儿您必须定义“会计科目”,“金额”,“摘要”. 在表单底部, 您有两个“支付”选项:一个是“直接支付”, 另一个是“稍后付款或集中付款“. 当您选择”立即付款“选项,您必须录入银行“帐户”. 当您点击”计算税“按钮后,”总金额“会自动包含计算的税款(如果您添加了增值税信息).
当您向供应商采购商品后,您会收到”采购收据“(一张票据),它在会计术语里叫”付款单据“。 When a purchase receipt is confirmed, it creates journal items automatically and you can record the supplier payment related to this purchase receipt, just like for the sales receipts.
您可通过菜单 :menuselection:`Accounting –> Suppliers –> Purchase Receipt`创建或修改采购收据。
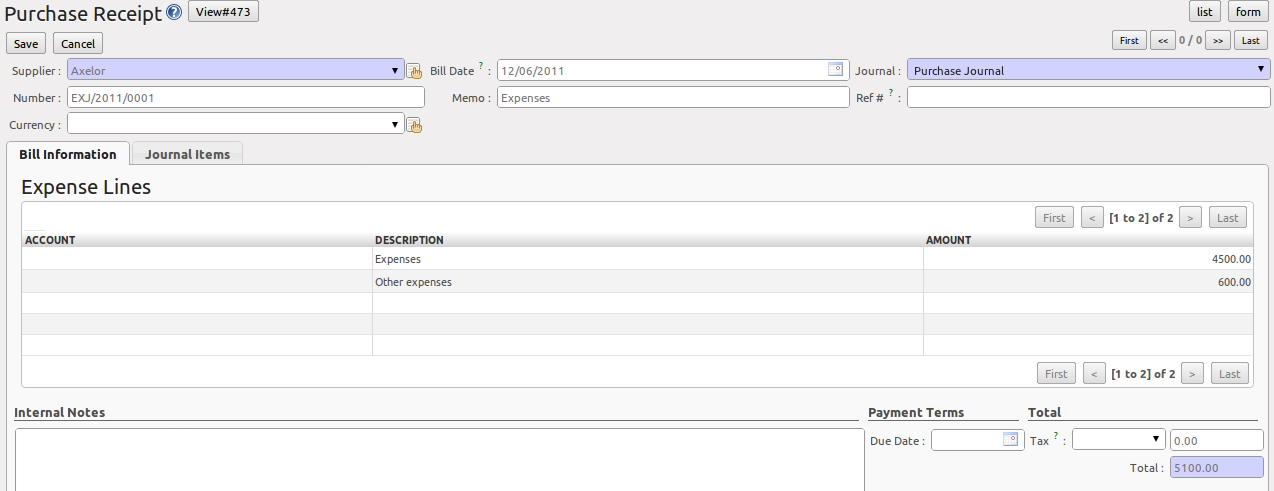
Purchase Receipt
Purchase Receipt 表单和 Sales Receipt 表单看起来很象。在这个表单中,请仔细选择分类帐。
开票给你的客户
很惊讶地看到在21世纪今天,大多数公司仍然采用手工处理报价单及发票,几乎都是通过邮寄或电子邮件的方式。但目前的明显趋势是这类传统媒体将会被即时通讯、社交网络等取代。电子数据交换(简称:EDI)平台在OpenERP中尝试与更多现代通讯系统相连接,在这个平台上,实现与合伙伙伴实时交换和同步电子文件。
最初的OpenERP支持某些特定的OpenERP的文件,如销售订单,采购订单和发票进行简单的电子数据交换(EDI)机制。
事实上,在OpenERP的集成电子邮件和发票系统允许您创建发票,并自动发送一封此发票的电子邮件链接给客户。
然后客户有几个选项。如果你的客户也有一个OpenERP的系统,只需通过点击你发送的链接,他可以很容易地导入此发票。
下面为你介绍一个EDI流程的例子::
- 贵公司发出销售订单,采购订单或发票给一个特定的合作伙伴,我们称呼为Camptocamp。
- 合作伙伴Camptocamp收到一封可链接到在线预览文件的电子邮件。
- 点击在线预览的文件,Camptocamp可以读取,下载或打印的PDF版本,然后选择几个选项:
- 导入此文件在他自己的OpenERP的系统,只需通过提供系统地址;
- 如需导入该文件,要求建立一个新的OpenERP的在线系统;
- 合作伙伴可以通过相应的EDI导入系统,将原EDI文件导入到他自己的第三方软件.
- 合作伙伴Camptocamp可以选择直接通过Paypal在线支付或任何其他贵公司提供的方式来付款.
自由定制的电子邮件模板 菜单 .
要获得EDI和自动发送订单和发票电子邮件,你需要EDI模块,这里是默认安装的。你需要添加一个合作伙伴的电子邮件地址,并确保“选择退出”复选框未选中。请询问您的系统管理员配置发送邮件服务器。注意电子邮件通知将被添加到一个邮件队列中,在一段时间内处理,但你可以强制邮件直接发送:菜单选择:设置 - >电子邮件 - >信息.
您客户将收到的电子邮件,如图所示。.
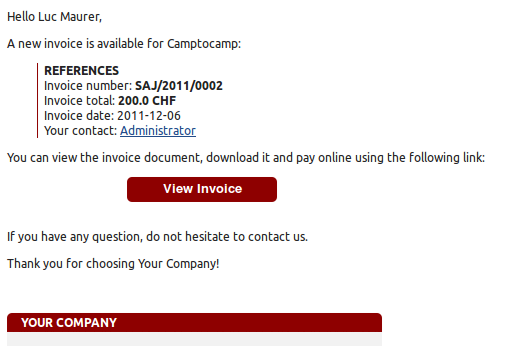
发邮件给您的客户
跟踪客户的支付进程
有效跟踪客户和供应商的付款是很重要的事,通过设定用户(User)表单中发票和付款(Invoicing & Payments)的访问权限,无论这个人员是否具备会计知识,都可以留意这些付款。
:guilabel:`客户付款(Customer Payment)允许您登记客户支付的款项。为了记录客户付款,你必须输入客户,付款方式(=日记账)及付款金额。 OpenERP的会自动匹配核销未清的发票、销售单据、信用票据和(预付)款项。
你可以登记客户支付款项,从OpenERP菜单menuselection:会计(Accounting) - >客户(Customers) - >客户付款(Customer Payment),点击新建登记付款。
客户付款
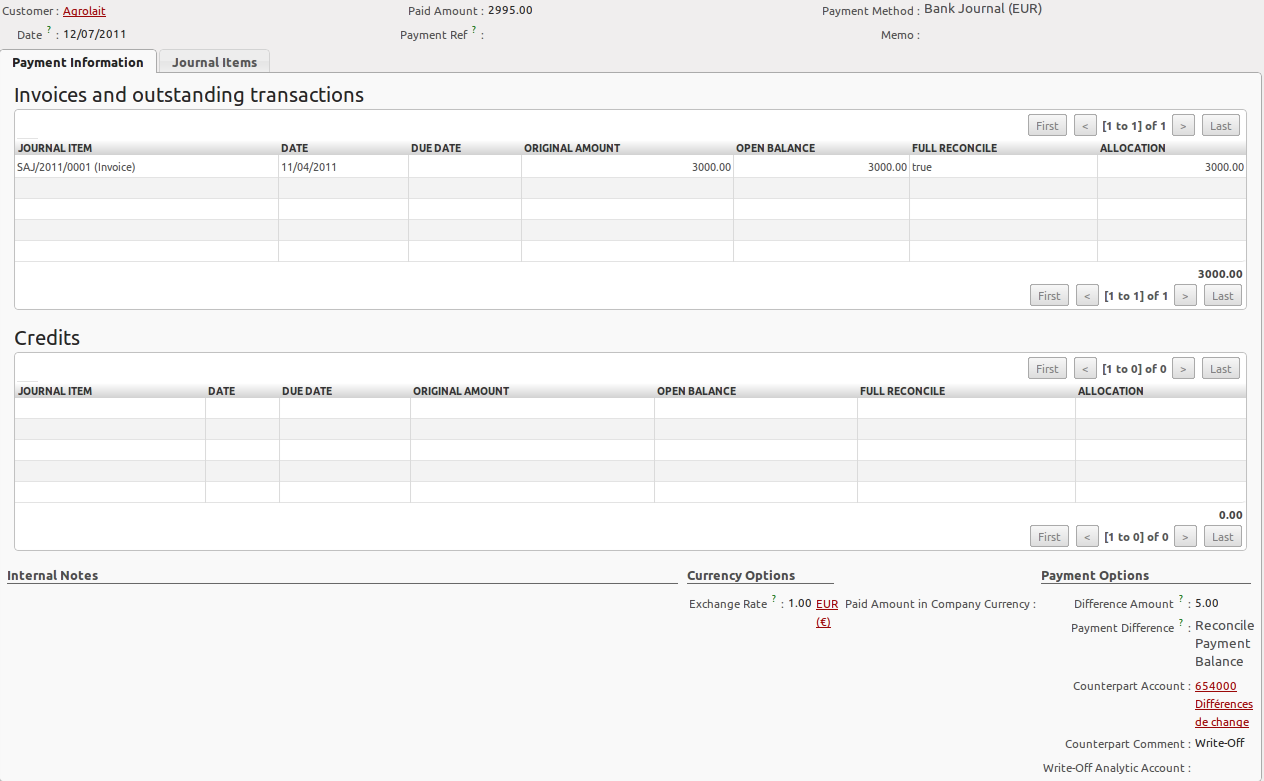
假设您有张3000 EUR的发票,然而您从客户那里收到的是2995 EUR。 您可以认为该发票已经结清,您将如何处理呢?
创建一张新的 Customer Payment, 选择客户,输入 Paid Amount, 比如 2995 并选择 Payment Method, 也就是您的银行分类账。所有的未结清发票,Any open invoices, credit notes or advances for this partner will be displayed on the Payment Information tab.
In this example, the 3000 EUR invoice will be proposed.
Now you have to tell OpenERP that you want to consider the invoice as fully paid. Simply click the invoice line on the Payment Information tab to make it editable. Now select the Full Reconcile checkbox, and notice that the amount changes to the full amount of the invoice.

Fully Pay
Select the proper option in the Payment Difference field, i.e. Reconcile Payment (you would use the Keep Open option if you want to claim the 5 EUR from the customer). The write-off amount is already proposed automatically, but you have to enter the Counterpart Account so that write-off entries can be generated by OpenERP. You can also enter a comment about the reconciliation (by default, Write-Off will be proposed). Then post your payment.
Note
Analytic Accounts
When you do analytic bookkeeping as well, you can enter an analytic account for the write-off too.
This easy payment system also allows you to post a payment that you cannot directly attribute to a customer as an advance.
Let us take the following example. A customer has two open invoices, one of 2000, one of 1500. He pays 1000, but you cannot assign this to any of the two invoices directly. You can just enter this payment as an advance. How do you proceed?
When you key in an Amount paid of 1000 in your Customer Payment, the amount will be attributed to the oldest invoice. You do not want this, because you have no idea yet of what invoice the amount should be linked to. Click the amount in the first line and set it to 0.
Validate the payment. The system will now create an advance payment of 1000 for the customer concerned.
Tip
Supplier Payment
The Supplier Payment form allows you to track the payment to your suppliers in the same way as a customer payment.
From the menu , click the New button to create a new Supplier Payment.
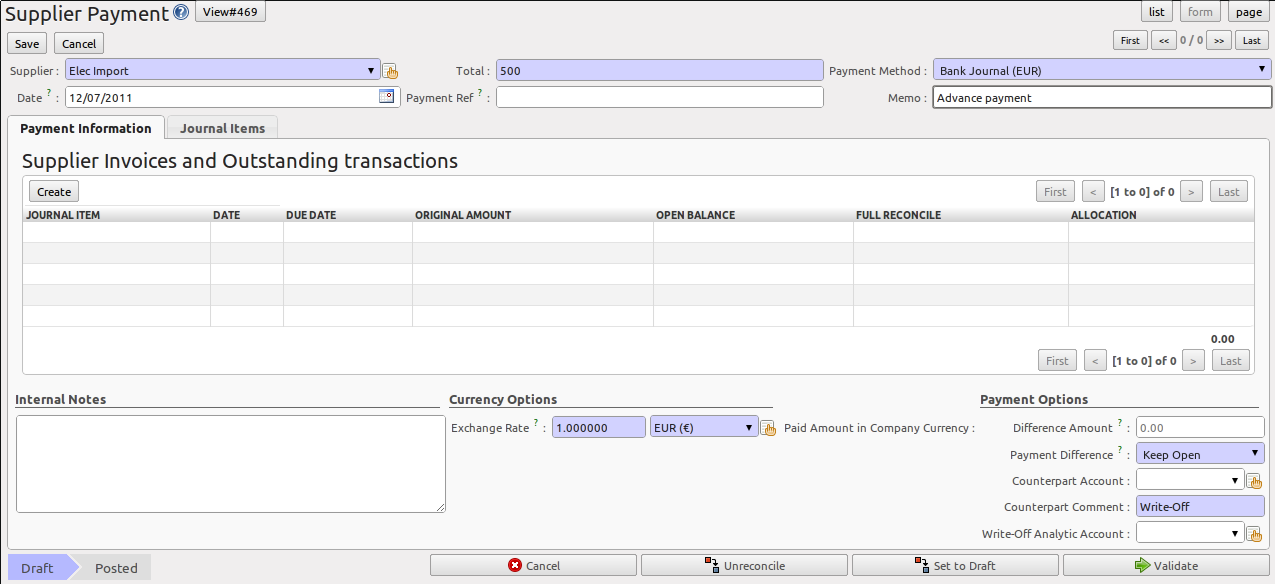
Supplier Payment Form
Another way of keeping track of your payments is the way accountants will do it, by encoding Bank Statements. For more information about this, please refer to the chapter on invoicemanagement.
You can also push your accounting further by importing your payments electronically through a CODA file you receive from the bank. To do this install the account_coda module.
How should you proceed?
You have to enter your company’s bank account(s) for which you want to accept CODA files. Go to the menu . Choose the bank account type you want to use (IBAN or normal bank account). For electronic payments, you should use IBAN; do not forget to also enter your bank’s BIC code.
Tip
Bank Journal
When you save the bank account through the Setup your Bank Accounts wizard, a bank journal will be automatically created for that account.
Then add the bank account details for each partner that will pay you through a bank. You can do this in the Partner form, on the Accounting tab.
Download the CODA file from your bank to any directory. Import the electronic bank statement through the menu .
Enter the data required in the wizard (receivable and payable account, bank journal and a default account to post to when no corresponding partner is found). Then select the CODA file in your directory and click the Import button to start processing the CODA file.
OpenERP will then import a draft bank statement in the selected journal and will match all corresponding customer / supplier payments when possible. You can change the draft statement if necessary from the menu . You can check any issues during file loading from the menu .