良好的预算管理
对于公司来说,预算是非常重要的,使你能很好地控制并预计费用和收入。他们使你能衡量财务状况相对于计划的实际表现。
OpenERP 使用总账和辅助核算来管理预算
进入菜单 并安装模块 account_budget 就可以做这些工作了.
The first step in defining budgets is to determine the general accounts for which you want to keep budgets (typically expense or income accounts).
That is what you will use Budgetary Positions for, from the menu . Here you can select the general accounts for which you want to keep budgets. The aim is to group general accounts logically, according to sales or purchases, for instance. OpenERP has no limitations as to the account types that can be used for budgeting.
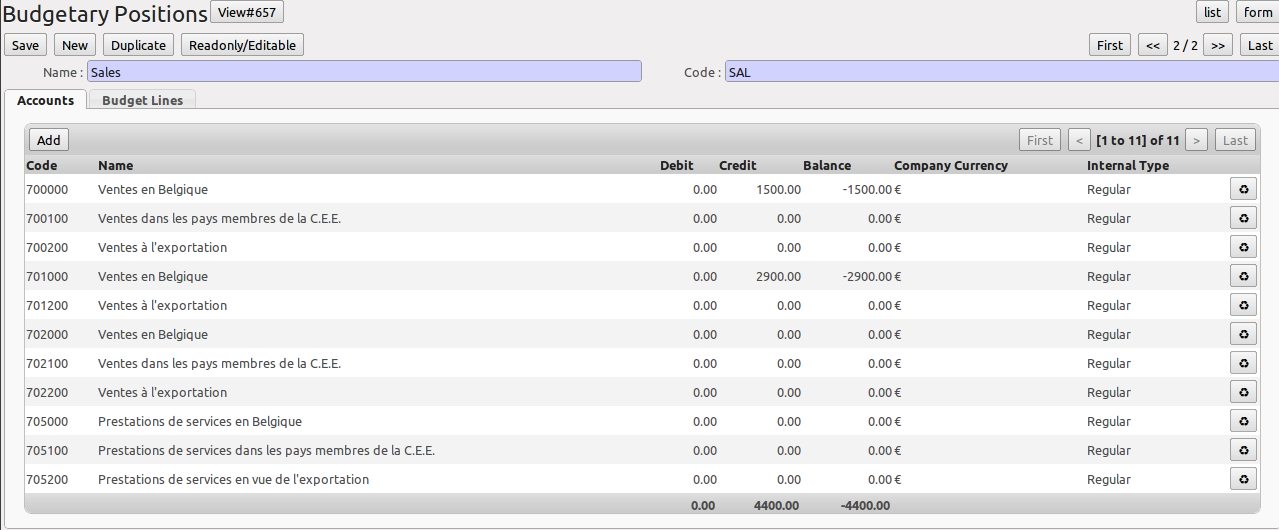
Budgetary Position for Sales
要开始预算, 点击菜单 , 点击 新建(New) 按钮可以创建一张预算单据.
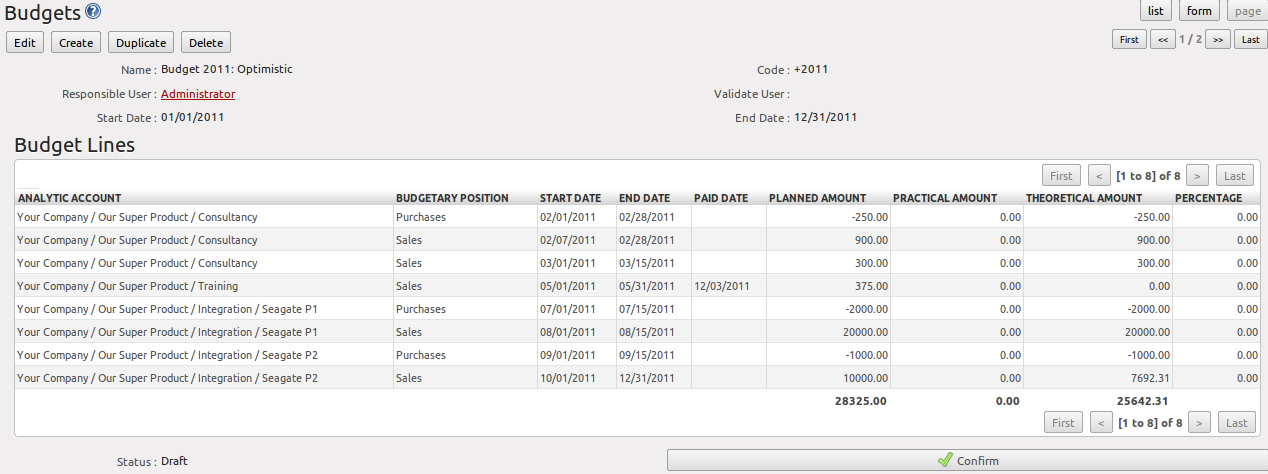
乐观预算
Tip
预算的版本管理
虽然你 可以 在任何时间进行预算的修改,但我们还是推荐只是做创建一个新的预算,这样才可以很明了地看到预算的整个修改历史.
Rather than edit an existing budget, make a new version so that you can keep your original estimates safe for comparison. This lets you analyse your changing perspectives of the company from revision to revision.
创建一张预算单后,输入 摘要(Name), 编码(Code), 起始日期(Start Date), 终止日期(End Date) . 然后将你要纳入预算管理的某个会计期间的辅助核算科目及预算金额全部一条条地填写进去(注意: 采购类的需要输入一个负数金额):
- an Analytic Account
- a Budgetary Position, for example
SalesorPurchases, - a Start Date and an End Date for the budget,
- a Planned Amount in the default currency of the chart of accounts.
上述信息完成后, 保存该预算单.
预算各阶段的流程:
- 确认(Confirmed): 表示预算已审核通过,但还是可以随时进行预算修改.
- Approved: the budget is approved by the budget holder; the name of the user approving the budget will be displayed in the
Validate Userfield.
如果觉得不合适,你随时可以在前面两种状态下, 取消(Cancel) 该预算单后再将其 置为草稿.
- 完成(Done): 完成状态的预算单就不允许再做任何修改了. 而且也不能再取消后置为草稿了.
The Theoretical Amount indicates the actual amount that might have been realised for the budget concerned according to the current date. When your budget is 1200 for 12 months, and today is the 30 October, the theoretical amount will be 1000, since this is the actual amount that could have been realised to date.
To print a budget and make calculations of expenditure through budget, use the menu . OpenERP then gives you a list of available budgets. Select one or more budgets and then click Print Budgets to create the report for each, in a date range of your choice.
The Print Budget report gives an overview of each analytic account included in your budget, according to the individual budgetary positions for that account. From the percentage and the comparison of planned (budgeted) and practical (actual) amounts, you have a good view on your situation.
From the same list of actions, you can also print the Print Summary report, which will give you a total per analytic account (without splitting by budgetary position).
Each of these reports can be printed from a specific date to a specific date. The End Date selected in the wizard determines how the theoretical amount will be calculated; if you select the last day of your financial year, the theoretical amount will be calculated as a function of that date (thus considering a complete financial year). Note that the theoretical amount will be zero when the Paid Date entered is equal to or greater than the End Date for the budget.
The percentage for a budget is calculated as follows: (practical amount / theoretical amount) x 100. This way you get a view on how much of the forecasted amount has been actually realised in your accounting.
The figure Printing a Budget gives an example of a budget produced by OpenERP.
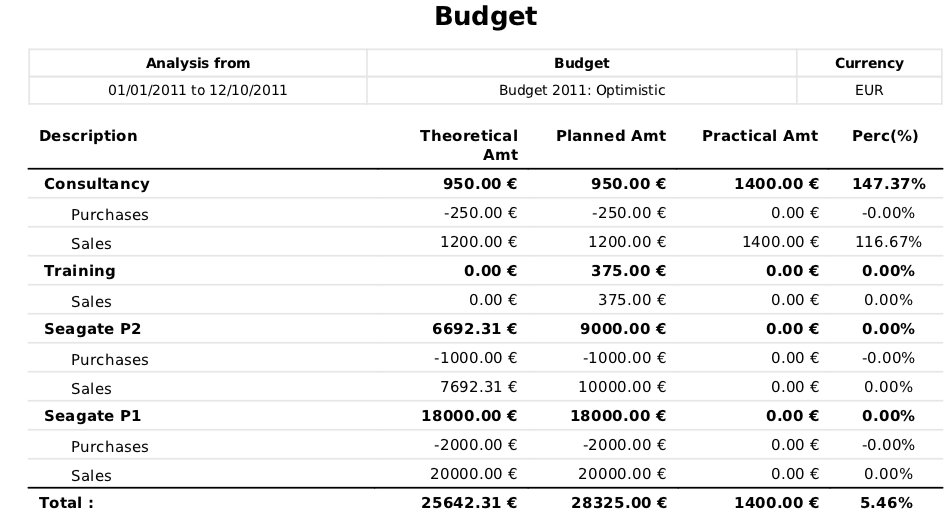
Printing a Budget

Summarised Budget
You could also use the menu . This gives an analysis of each budget line.
From the menu , you can print the budgets for an individual budgetary position. Open a budgetary position, and click the Budget Lines tab for a graphical representation of your budgetary position.
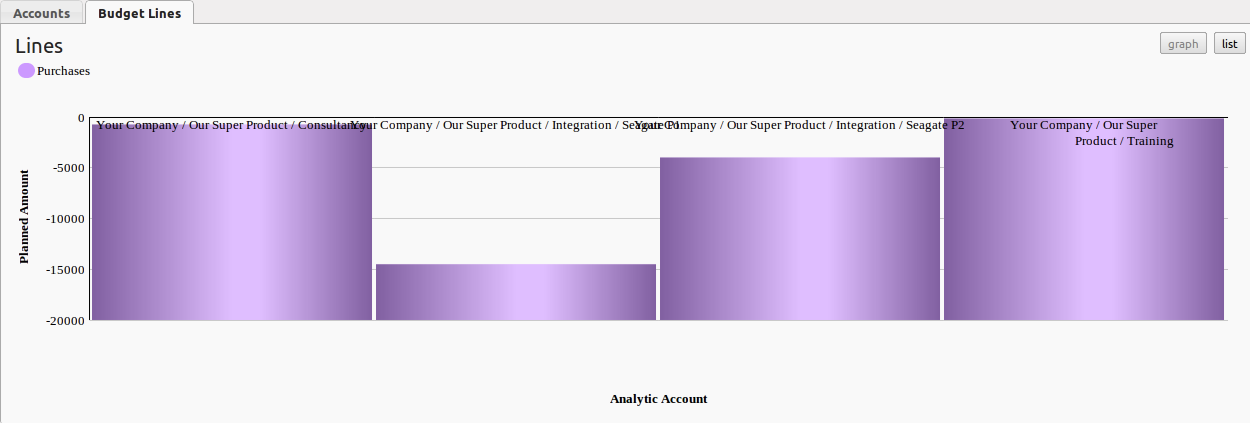
Graphical Representation of Budgetary Position
Note
Print Reports
You can also print budgets from the menu .
会计仪表板
You can open the Accounting Dashboard in more than one way: either by clicking the Accounting button at the top of the web screen, or from the menu .
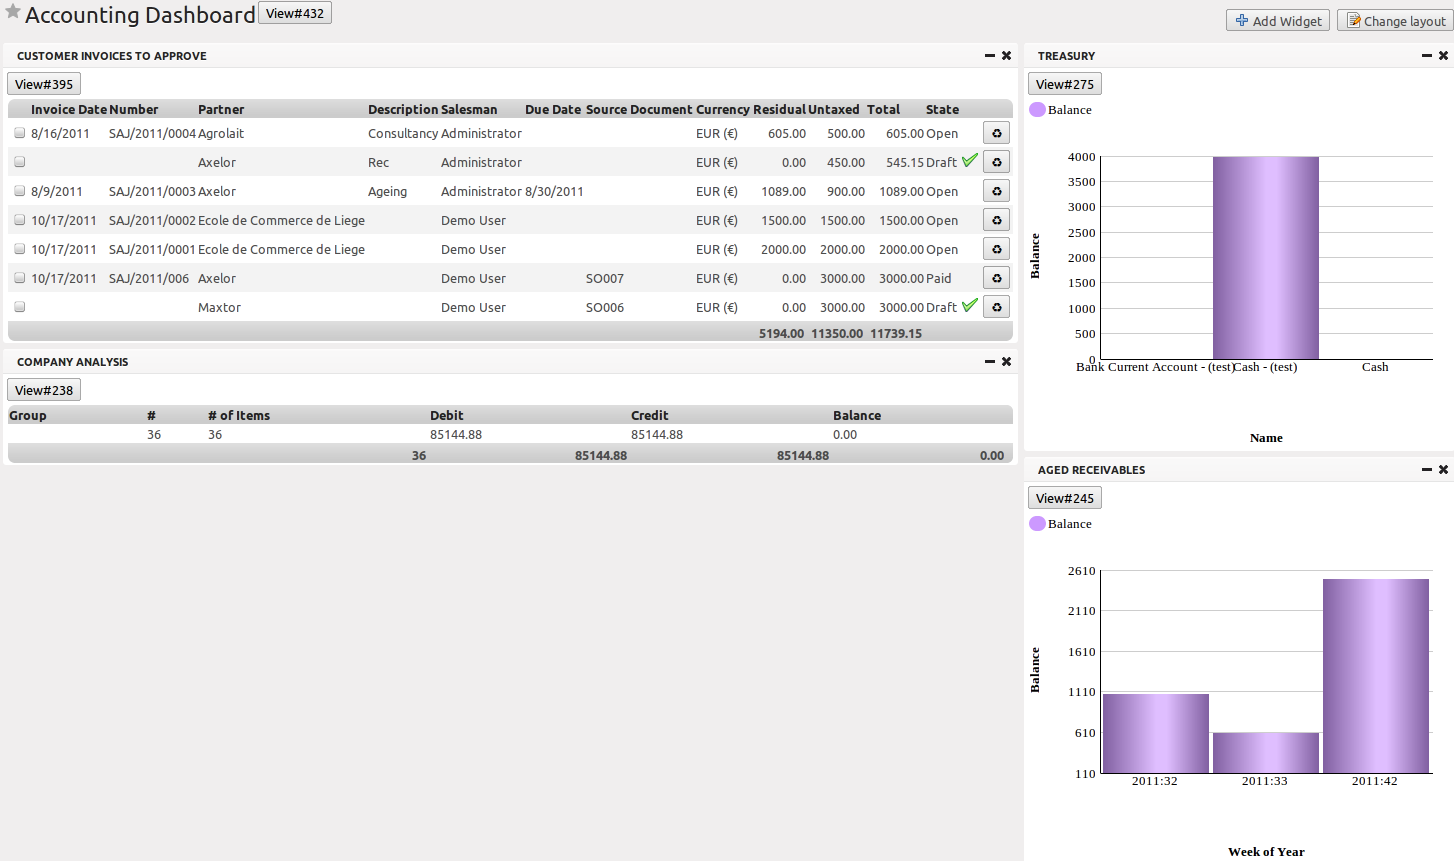
Accounting Dashboard
OpenERP gives you an accounting dashboard that will be presented to your accounting staff as they sign in to the Accounting system (you can also set the dashboard as their Home Page by setting the Home Action to Accounting Dashboard in the User form). This dashboard provides an analysis of the company’s financial health at a glance.
The description of the different parts of the dashboard, from top to bottom, then from left to right, is as follows:
- Customer Invoices to Approve : gives the list of invoices waiting to be approved by an accountant.
- Company Analysis : lists the debit, credit and balance of all account types.
- Treasury : shows the balance per Bank account in graphical view.
- Aged Receivables : gives a weekly graph of the receivables that have not yet been reconciled.
For most of the panels of the Accounting Dashboard, you can click a line or a graph to investigate the detail of your financial indicators.
The Accounting Dashboard is dynamically integrated, which means that you can navigate easily through the data if you want more detail about certain factors, and edit the entries if necessary.
The Change Layout button at the top right allows you to change the way the dashboard is displayed; you can choose among several options, such as one column, two columns, etc.
You can also add other features to the dashboard and customise it to your needs with the Add Widget button. You can easily Undo changes or Reset the original dashboard.